Brake Light Bulb Replacement – How to Guide
Brake Light Bulb Replacement:
In this article, we are going to show you the basic procedure of a Brake Light Bulb Replacement.
Changing a brake light bulb is usually a very simple process(with the exception of a few vehicles which require you to remove all sorts of interior parts to get to the bulbs.

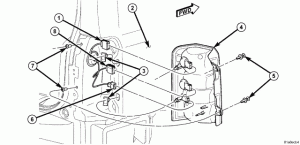
Removing light housing from car
Most of the time access to the bulb is only restricted by some simple metal screws/bolts and/or pushpins, which can easily be removed with a basic screwdriver set and trim removal tool.

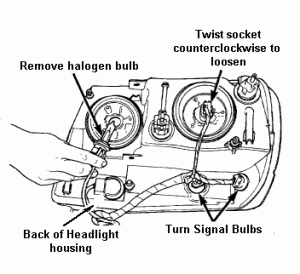
Removing bulb from the housing
When you get access to the bulb, it will be twisted into place in the electrical socket. To remove it you only have to twist backward and pull. Sometimes on older plastic assemblies the plastic will harden in place and become brittle, use caution not to break the bulb housing in the process of removal.
When installing the new bulb try to use a cloth or glove and do not touch the glass directly. The oils on our skin can contaminate the glass and decrease the life of the light.
Some bulbs will look similar, but not have the same internal filaments or glass color. Be sure all lights and safety equipment are matched up with the correct part number before replacement.
Be sure to inspect the bulb socket/connector while you have it out. It is very common for these connectors to get hot and melt, therefore shorting out and blowing the bulb.
If everything looks good and is free of damage then we can get the bulb installed back into the light housing and back onto the car.
When you get the new bulb installed then we can make sure to check for proper operation of all lights. After that, you’re good to go!!


Thanks so much for the step by step and helpful illustrations. The pointers along the way (like when to use a cloth or glove) were really helpful in the process of replacing a brake light. I knew that it had to be an easy thing to do, but needed a easy-to-follow guide to walk me through it. Thanks for all the info on brake light bulb replacement.
Hello Gabriel, I must say that this article is very helpful and informative. Actually, I was looking for this guide, I asked some of my friends but they don’t know to explain properly. The Internet is truly a great place to find a solution for everything. Thank you for sharing illustrations, it is of great help!
Hello, thanks for stopping by! I am glad you found the information useful 🙂 Hope to see you in the future!
What a great article Gabriel. Thanks for the step-by-step instructions about how to do something that everyone, at one time or another, will need to deal with. I’ll be sure to show this to my girlfriend and maybe she won’t need me to do it for her when her brake light needs to be replaced. 🙂 Everyone should know how to do basic repairs and maintenance on their car. Keep up the good work. Take care.
Bob
Hello Bob, I am glad you found some value here! Share with anybody you might think may use it 🙂
Hello,
Good article for general people like us. for replacement I need to call for help which is sometimes tough for me. But your step by step illustration really encourage my inner me to follow the replacement method specially your little types will be very useful for me like using gloves in the right time! I think now I am confident in how to replace a brake light bulb.
Thank not enough for this article but I really appreciate your efforts. Keep sharing!
The concept is already well known and very popular. Simple mechanism, changing direction like simple metal screws/bolts and/or pushpins, and tools removed with a basic screwdriver set and trim removal tool.
Not yet been experienced with this system but watched it in servicing center.
Good opportunity to have this well-established webpage blog. I have already saved it for further notification.
Thanks!
Thank you for this insightful post, good to be able to apply some do-it-yourself (DIY) skills. Instead of been stranded just because of simple things you can handle yourself. For me, I have a full toolbox in my car and I carry it around anywhere I go.
Like you said, the process is simple, my take away from the post is to always use a glove or a small piece of cloth when installing the new one.
Awesome, I am glad you found some good information here. I am glad to hear you keep tools in your car and stay prepared, that is very smart